Accounting Center Configuration Guide
This guide provides best practices and complex configuration guidance for Accounting Center. It complements the Workday Administrator Guide.
General Configuration and Information
Derived Datasets
We recommend creating derived datasets to perform all enrichment transformations.
Steps: Derived Dataset for Enrichments (DDS)
- Search Data Catalog.
- Select Create > Derived Dataset.
- Select the Enrichment System Filter Dataset for the applicable stage (XX_ENR_#_SYS_UnprocessedForBatch).
- Hint: Copy the name of the dataset from the Implementation view. Name the dataset for what it’s doing (Example: Worktag Mapping, Validation).
- Dataset Name: XX_ENR_#_DDS.
- Save.
- Select the Enrichment System Filter Dataset for the applicable stage (XX_ENR_#_SYS_UnprocessedForBatch).
- Edit the Enrichment User dataset for the applicable stage (XX_ENR_#_USR_UserConfiguration) to update the import dataset to the derived dataset:
- From the applicable Enrichment User dataset in Implementation view XX_ENR_#_USR_UserConfiguration > Dataset > Edit.
- Import (not Change Pipeline!).
- From the applicable Enrichment User dataset in Implementation view XX_ENR_#_USR_UserConfiguration > Dataset > Edit.
- Click the pencil next to dataset name.
- Select XX_ENR_#_DDS (it should be at the top when sorted by last modified).
- Save (upper right).
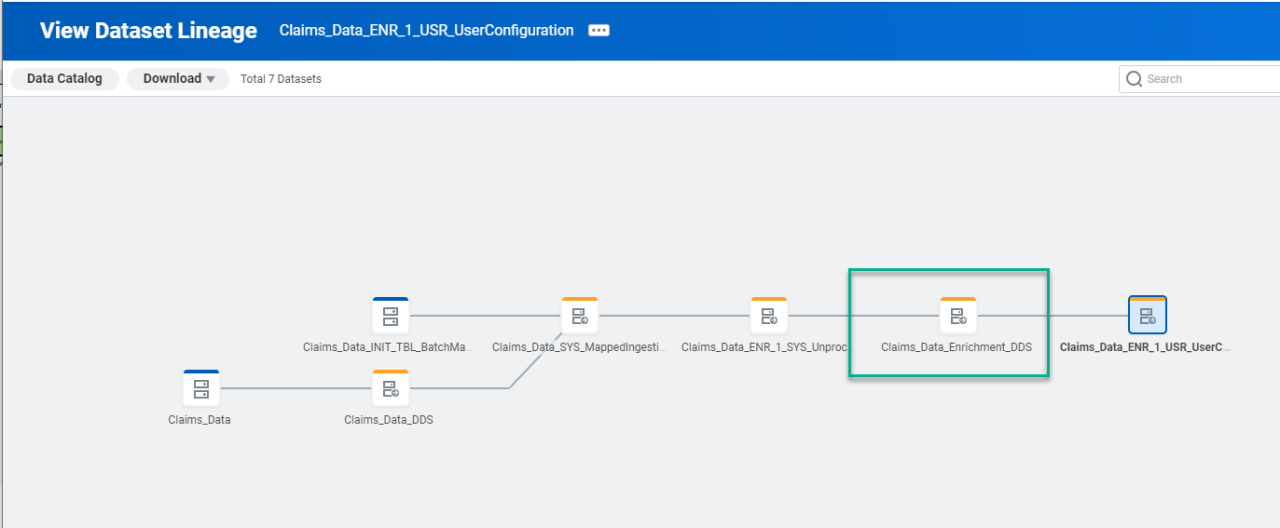
- View dataset lineage to confirm proper insertion of the derived dataset:
- Click View Dataset at the top of current page.
- From the dataset name > Dataset > View Lineage.
[Click image to enlarge]

Business Process Configuration Examples
Notify groups when errors occur in the batches using the workflow notification on the business process.
Steps
- Add notification from the related action off the business process definition.
- As you create the Workflow Notification, consider these triggers:
| Triggers | Select the Batch or Job for the Primary Process |
| Condition Rule | Source External Field: Error Transactions for a Stage Relational Operator: Greater than Comparison Type: Value specified in this filter Comparison Value: 0 |
| Recipients | Accounting Center Administrator |
Configure the business process definitions for both enrichment and detailed accounting to dismiss specific Accounting Center transactions from a batch. You can dismiss transactions that are in error or transactions with specific criteria. Example: $0 transactions.
Steps
To build custom dismiss logic into the business process to Dismiss from Further Processing transactions:
- Assess and build the logic for dismissals during Enrichment or Detailed Accounting in the Prism Dismissal dataset.
- Update the applicable business process to include the step for custom dismissal.
Prism Dismissed Transaction Dataset Setup
For the custom dismiss logic to work, the system needs to know what transactions to dismiss. We do that by configuring a couple of datasets within the Dismiss datasets.
- Select the User Configured Dismiss System dataset (XX_USR_UserDirectedForDismissal) by going to View Implementation (related action from the Accounting Source) and scrolling to the bottom of the list.
- Edit the XX_USR_UserDirectedForDismissal dataset. The Import is set by default to the Ingestion dataset of the Accounting Source. Change it to a dataset that contains:
- The Accounting Center (AC) Transaction IDs of the transactions that you want to dismiss.
- Any fields added in the enrichment stages required for the dismissal filter (if necessary).
- Note: We recommend that you only bring the current AC batch into the XX_USR_UserDirectedForDismissal dataset. Example: If you want the Enrichment output dataset to be your import into the dismissal dataset, you should filter this down to bring in the current batch rather than importing the entire dataset. This improves performance and ensures that the Custom Dismissal only runs when needed. There are 2 ways to accomplish this:
- 1. Create a DDS that imports the Enrichment output dataset and then create an inner join with the UnprocessedForBatch dataset for that stage. The UnprocessedForBatch dataset contains only the current batch information so by doing an inner join on AC Batch and AC Transaction ID, you can isolate the enriched data for most recent batch. This DDS should then be the import into your XX_USR_UserDirectedForDismissal dataset.
- 2. Create a table for Current Batch and use Studio integration to write the current batch to this table as part of your business process. Similar to option 1 above, use this Table in a join with your import dataset.
- Capture the transactions that the custom dismiss needs to dismiss by configuring a filter within the User Configured Dismiss System dataset. To add a filter, click Add Stage and select Filter. The filter narrows down the records from the import dataset to those records required for the custom dismissal. If you’re selecting the error table for the stage as the import dataset, this action pulls in all error transactions for the stage. To only get the errors for a particular error code, add a filter stage to narrow down the contents to just the code desired.
- Save the dataset.
Business Process Changes
Next, change the business process for the Enrichment stage.
In the Enrichment business process, you need to add a post-processing step. This step will come after the batch or job of Accounting Center Enrichment Primary Process.
If you’re building into the Default definition, you need some condition rules to qualify the step. Also add conditions so that the dismissed transactions aren’t reprocessed if the stage is rolled back. Your condition rules should:
- Be for a particular Accounting Source and Accounting Source Stage only.
- Include only when the stage has errors (if you’re dismissing errors) or when there are successful transactions in the stage (when dismissing something other than errors, for example $0 transactions).
- Include only when the processing action is Run Unprocessed Transactions or Process Errors within Stage (if you’re dismissing errors).
Note: The Primary Process Rolled Back Indicator indicates when a process has been rolled back via another process. This indicator is updated on the prior run that was rolled back during the process and not on the rollback itself.
Steps:
- Go to the Accounting Center Enrichment Event (Default Definition).
- Edit the definition (Related actions > Business Process > Edit Definition).
- Leave defaults for date (Today).
- Add a step after the batch or job (Use + sign to add row).
- Define the step as a batch or job and select Request Dismiss Transactions from Further Processing.
- Add a Run as User – preferably an integration system user (ISU).
- Click OK to save.
Next, we need to configure the condition rules on the step.
Create Condition Rules:
On the step you just created, use the Create Condition Rule on the related actions menu.
Here are examples of the condition rules:
| Condition Rule | Configuration |
|---|---|
Accounting Source *This condition rule doesn't apply if you have business process definitions for specific accounting sources. | Source External Field: Accounting Source Relational Operator: In the selection list Comparison Type: Value specified in this filter Comparison Value: Select the applicable accounting source |
Accounting Stage Has Errors *This condition rule doesn't apply if you aren’t dismissing transactions from an error table. | Source External Field: Errors for a Stage Relational Operator: Greater than Comparison Type: Value specified in this filter Comparison Value: 0 |
Process Option in Run Unprocessed, Process Errors *This condition rule doesn't apply if you aren’t dismissing transactions from an error table. | Source External Field: Process Option Relational Operator: In the selection list Comparison Type: Value specified in this filter Comparison Value: Process Errors Within Stage Run Unprocessed Transactions |
| Stage has Successful Transactions. | Source External Field: Success Transactions for a Stage Relational Operator: Equal to Comparison Type: Value specified from another field Comparison Value: Transactions in for a Stage |
- Once you’ve created the rules, go back to the business process and go to the step for the custom dismiss.
- Use Maintain Step Conditions on the related actions menu.
- Select the condition rules that you created and click OK to save.
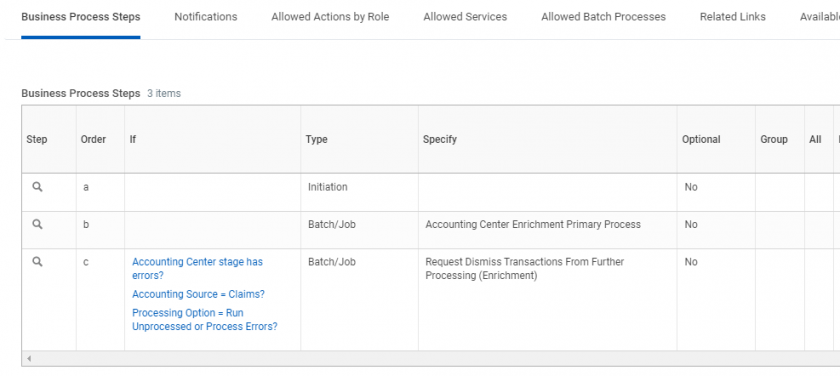
Note: Don’t make the custom dismiss step a completion step, as it interferes with the operation of the batch steps.
Processing Configuration Options on Accounting Source
Currently the custom dismiss works with the processing options as currently defined.
If the configuration is Always Advance to Next Stage and Dismiss Any Errors to Next Batch, the custom dismiss will be in addition to those options.
If you encounter errors, the process works as follows:
- Main process identifies the errors.
- Move to the custom dismiss if any and Dismiss from Further Processing.
- If the custom dismiss doesn't capture any errors, it sets to Dismiss to be Processed in the Future.
If the configuration is Only Advance to Next Stage If No Errors, the custom dismiss dismisses the specified errors. However, it leaves any other errors for fixing.
Use Case
We recommend utilizing Reporting Tables to replace any dataset publishes as there are significant performance improvements due to the ability to incrementally load new data to Tables through DCTs compared to publishes which must republish the entire dataset. Tables that are enabled for analysis (aka Direct Table Query) have their own Prism Data Source and are immediately available for reporting.
To facilitate this, we have added a Data Change Task integration into the Configuration Catalog which can be download directly to your tenant through Customer Central. This integration can be added as a post-step to Accounting Center business processes similar to a publish. For example, you can use this integration in the Accounting Center Summarization Event BP to load an AC Reporting TBL instead of publishing the SummaryandDetailedAccountingReference reporting dataset.
Steps
- Create an AC Reporting TBL from the SummaryandDetailedAccountingReference reporting dataset for the Accounting Source. Load TBL once with current data through DCT if applicable.
- Create a new DDS off of the DetailedAccounting TBL. For this example, call it SummaryandDetailedAccounting_DDS. Configure it at follows:
- Add a filter stage, convert the filter to advanced, and enter ([WPA_LoadTimestamp] >= DATE_ADD(TODAY(), -5, "day")). This will return data from the DetailedAccounting TBL for the last number of X days (in this case 5) based on the WPA_LoadTimestamp. The days can be changed as needed depending on batch frequency.
- Add a inner join with the JournalToDTLRowIDLinkage TBL from Summarization stage. Select "WPA_RowID" as primary pipeline key and select "Detailed_Acccounting_Row_ID" as the secondary pipeline key. Select all fields from the primary pipeline. Select these 3 fields from secondary pipeline: "Detailed_Accounting_Row_ID", "Journal_Entry", "Journal_Line"
- Click the Change Pipeline button and select the Additional Pipeline for the JournaltoDTLRowIDLinkage.
- Add a filter stage, convert the filter to advanced, and enter ([WPA_LoadTimestamp] >= DATE_ADD(TODAY(), -5, "day")). This will return data from the JournaltoDTLRowIDLinkage TBL for the last number of X days (in this case 5) based on the WPA_LoadTimestamp. The days can be changed as needed depending on batch frequency.
- Click the Change Pipeline button, select the Primary Pipeline, and click Save.
- Note: This DDS replicates the logic from the SummaryandDetailedAccountingReference reporting dataset, however the key difference is that it filters down the DetailedAccounting and JournalToDTLRowIDLinkage TBLs to just the last number of X days. This significantly improves the performance of the join logic.
- Create a new DDS off of the SUM_SYS_UnprocessedForBatch system dataset from Summarization stage. For this example, call it Latest_Batch_DDS. Add a Group By stage and group on AC_Batch field. This should return just a single row of data as this dataset only contains data from the most recent batch.
- In the SummaryandDetailedAccounting_DDS from Step 2, add a new inner Join with the Latest_Batch_DDS. Keep all fields from the Primary Pipeline and deselect any from the Secondary Pipeline. This dataset should now contain the same information as the SummaryandDetailedAccountingReference reporting dataset, but only for the most recent batch.
- Create a Data Change Task like below:
- Source: SummaryandDetailedAccounting_DDS
- Target: AC Reporting TBL
- Operation: Insert
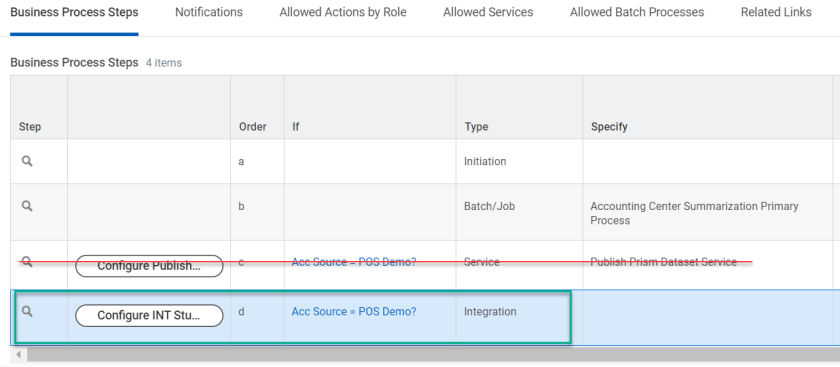
- On the Accounting Center Summarization Event BP, replace the publish step with a new integration step as shown below. Configure the integration to use the INT Studio Prism Data Change Task Initiator Inbound and select the DCT from Step 5 as the Task.
Ensure that the integration step is part of pre-completion and that the batch/job for the primary process is not marked as the completion step.
This configuration provides immediate performance improvements as the AC Reporting TBL updates with records from the most recent batch and there will no longer be a lengthy publish step in processing.
Important Notes:
- The approach above might not be suitable if multiple batches will be hitting the Summarization stage concurrently. The "SUM_SYS_UnprocessedForBatch system dataset" only contains the latest batch value, so depending on integration runtimes and the number of batches, the latest batch value could change prior to an integration run completing. Our recommendation in this case would be to run the DCT integration on a periodic basis to load all data for a given day rather than after every batch. For example, the DDS off SummaryandDetailedAccountingReference could be filtered down to batches just for the day and then used in the Insert DCT.
Cancelled Batches
When an Accounting Center batch is canceled, the batch data is automatically removed from any success output tables and error tables for the Accounting Source, however it is not automatically removed from AC Reporting TBLs built on top of these. For instance, in the example above, the AC Reporting TBL contains the same data as the SummaryandDetailedAccountingReference reporting dataset. If a batch is canceled, the data is removed from the reporting dataset as part of the cancel batch task but remains in the AC Reporting TBL. There are 2 primary options to update the TBL and ensure it is in sync:
Option 1 (recommended): Run a delete DCT that removes any data from the AC Reporting TBL which is not found in the SummaryandDetailedAccountingReference reporting dataset. This can be run immediately after batch cancellation, run periodically to ensure data is in sync, or run as part of the DCT flow if you are using an integration.
Steps
- Create a Canceled_Batch_DDS off the AC Reporting TBL and add a group by stage on AC_Batch and WPA_LoadID. This should result in 1 record for each batch.
- Create a DDS off the SummaryandDetailedAccountingReference dataset and add a group by stage on AC_Batch. This should result in 1 record for each batch, and will not have any canceled batches.
- In the Canceled_Batch_DDS, add a left outer join with the DDS above that joins on AC_Batch and select all fields from both pipelines. The record count should remain the same and a null value will be displayed in AC_Batch 2 column for any canceled batches.
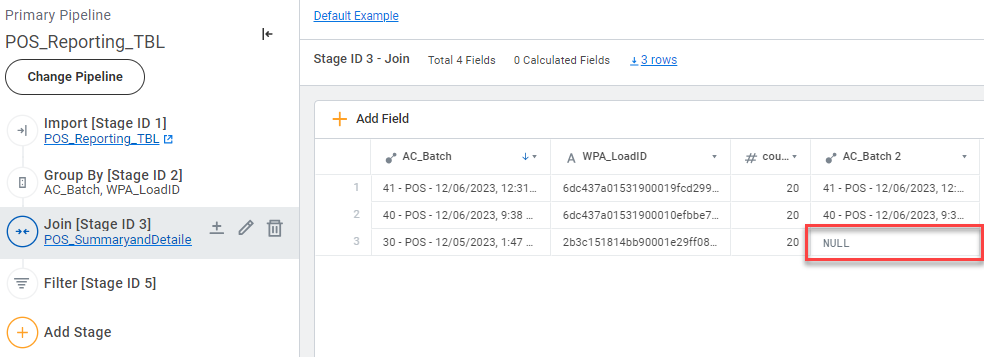
- Add a filter stage that filters on AC_Batch 2 is null.
- Create and run a Delete DCT like below:
- Source: Canceled_Batch_DDS
- Target: AC Reporting TBL
- Operation: Delete
- Delete Key and Delete Mapping: WPA_LoadID
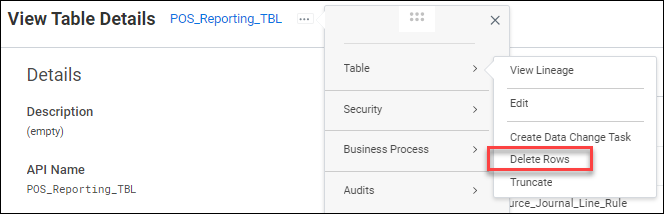
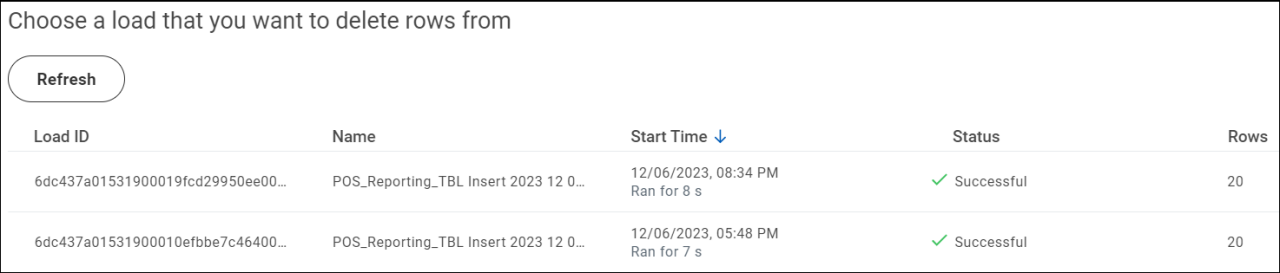
Option 2: You can also manually delete a specific load from a TBL via the "Delete Rows" related action. This can work if you have canceled the most recent batch and just need to remove the most recent DCT load. However this is more complex with multiple frequent loads and will also depend on security configuration.
If you have accounting source dependencies, you can set them up on the Accounting Center Summarization business process by initiating a new batch once the prior batch has completed summarization and publishing.
The dependent batch can be initiated by either calling the appropriate Studio integration, if applicable, or by calling the Put Accounting Center Batch web service. For the web service, ensure you create an EIB with the appropriate security first, and then configure it as shown below.
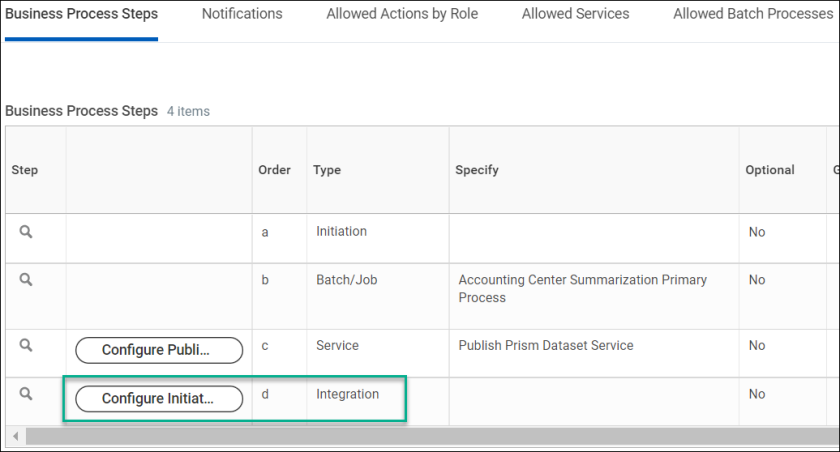
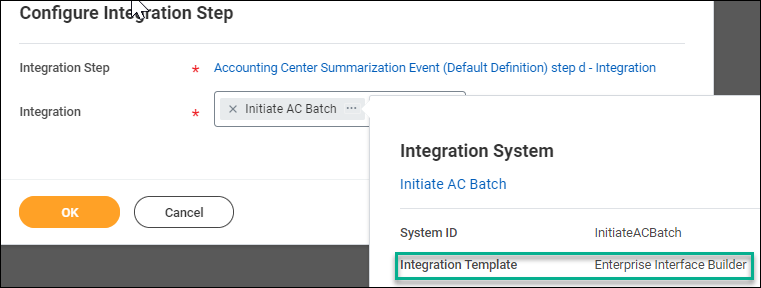
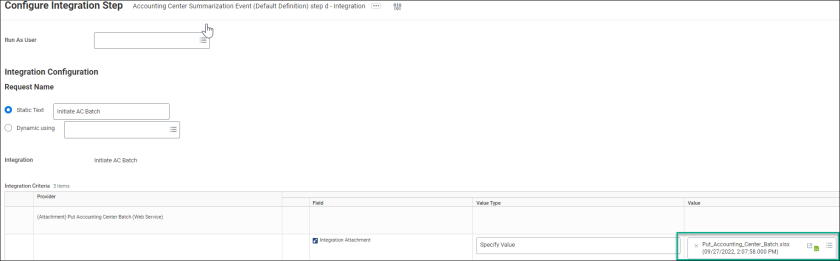
All Accounting Center BPs except for Batch Initiation can have pre and post processing steps (for example: publish, integration, etc) as it relates to the primary batch or job for the step. Batch Initiation can't have either pre or post steps.
These steps are called each time the BP runs. You should therefore utilize condition rules to ensure that they're only called when needed (see condition rules in Custom Dismissal section above).
Error Handling and Validations
This section covers what you should know about the 3 validation options:
- Validation Stages Configured in Enrichment
- Custom Validations in Detailed Accounting
- Delivered Validations
Validation Stages Configured in Enrichment
We recommend you create a derived dataset containing your validation stages between the system filter (XX_ENR_#_SYS_UnprocessedForBatch) and the user dataset (XX_ENR_#_USR_UserConfiguration). Include this derived dataset in a separate enrichment stage from your data transformations (instantiations, mapping, and so on).
These validations are helpful in preventing invalid data from getting to the detailed accounting stage. Errors will occur in the enrichment stage of the batch. Workday delivers 5 custom fields that can you can use in the error table to enhance troubleshooting. If you need more fields for analysis, you can create a derived dataset that joins the enrichment error table with the enrichment output dataset. It’s possible to dismiss some errors from future processing while allowing others to reprocess with a future batch. Make updates related to the transformations in the enrichment stage (Example: The mapping tables) to ensure that the transactions don’t have an error again.
The maximum number of errors Workday allows from your validation is 10,000. The batch stops if the number of validation errors exceeds that number.
Custom Validations in Detailed Accounting
You can share custom validations for Accounting Center Detailed Accounting with accounting journals. When the custom validations meet conditions, errors will occur in the detailed accounting stage of the batch. Workday doesn't support custom validation warnings.
A common use case for custom validations is proper worktag combinations on the journal lines.
Workday delivers these validations in the detailed accounting and summarization stages:
- Pre Accounting Engine (Area: Cash Accounting)
- The enriched data set is missing a Bank Account worktag for a reconcilable item.
- Bank account value is valid for use with the Line Company.
- The transaction and bank currency must match for the bank account
- You must select a Cash account for reconciliation
- Pre Accounting Engine (Area: General)
- Accounting Date must fall in an open period for both the header company and line company.
- Configure the line company with the header company for intercompany transactions.
- Enter a reversal date that is on or after the accounting date.
- Header company is missing.
- Journal Source field is missing valid values.
- Ledger Account field is missing valid values.
- Ledger Type field is missing a valid value.
- Line Company is missing.
- Reversal Journal date field is missing date values.
- Reversal Journal Date must fall in an open period for both the header company and line company.
- Transaction debits don’t equal transaction credits.
- Transaction ID should have a valid value.
- Worktag (Cost Center, Company, and Supplier) value is valid for use with the Line Company.
- Ledger account is valid for the Line Company account set.
- Ledger account isn’t restricted from use by the Line Company.
- Alternate Ledger account isn’t restricted from use by the Line Company.
- Ledger account isn’t retired.
- For non-multicurrency transactions, we validate that the transaction amount from the source data matches the decimal precision of the ledger currency for the Line Company.
- For multicurrency transactions, we validate that the transaction amount from the source data matches the decimal precision of the applicable transaction currency.
- For multicurrency transactions, we validate that the ledger amount from the source data matches the decimal precision of the ledger currency for the Line Company.
- You can't enter transaction and ledger amounts which result in a negative currency rate on detailed journal lines.
- Pre Accounting Engine (Area: Intercompany)
- The Journal Line rule configured to an Intercompany ledger account contains an Intercompany Affiliate worktag. Remove the Intercompany Affiliate worktag from the Accounting Source Journal Line rule.
- Pre Accounting Engine (Area: Multicurrency)
- Enter a line company, which has the same ledger currency and currency rate type as the header company.
- Select Enable Multicurrency and specify the transaction currency for this transaction.
- You can’t have a zero conversion rate for a transaction that results in a zero ledger amount.
- Enter all debits and credits for each transaction in the same transaction currency.
- After Accounting Engine (Area: General)
- Accounting Source Configuration doesn’t generate a journal entry with at least one valid line.
- Journal is unbalanced.
- Journal line must have a ledger account.
- Balancing Worktag is enabled. Balance your journal lines with a unique combination of valid worktags for your balancing worktag type.
- Miscellaneous Accounting Engine (Area: General)
- Accounting group only applies to transactions when all rows with the same AC Transaction ID pass the Accounting Group condition rule.
- One or more accounting groups with the same AC Transaction ID contain errors.
- The transaction must meet the condition rule for at least 1 accounting group that contains a valid snapshot. Roll back the transaction and reprocess it again.
- You can’t process more than 300,000 records per transaction in Detailed Accounting. You can split your transaction into smaller groups by updating the Transaction Grouping ID and re-processing.
- Summarized Accounting (Area: General)
- Journal is unbalanced.
- Related journal is in error.
- Related journal is unbalanced.
- Can't create reversal because the ledger period for the reversal date doesn’t exist or is in an invalid status. Use the Ledger or Ledger Period task to create the period.
- The ledger period status for the journal is invalid.
Audit Reports to Balance Accounting Center to General Ledger
Use these reports to verify that total transaction amounts input into a batch:
- Match the transaction amounts processed through ingestion, enrichment, and detailed accounting stages.
- Post to the General Ledger upon batch completion.
This process requires grouping transactions in a batch and summarizing transaction totals for:
- Each batch stage.
- The journal lines of the accounting source summary journals resulting from the completed batch.
You can create these reports using a Composite Report or Discovery Boards. You must have a working knowledge of Workday reporting. Also a familiarity with Workday Prism concepts (datasets, publishing) will be helpful. You can automate dataset publishing in the business process.
Create sub reports for the composite report: The composite report in Workday consists of matrix reports from multiple data sources to source the data for the combined composite report.
We need a matrix report from the Accounting Center (AC) data and one from the Workday General Ledger (GL) data.
AC Data
Select the AC dataset that contains the data from the AC process you want to balance against. Usually you want to select at least enriched data that have Workday worktags matching the worktags in the GL.
To select the dataset, use the Accounting Source Implementation view (Access from related actions off the accounting source).
In the case of using enriched data – select the output of the last ENR stage (XX_ENR_#_TBL_EnrichedData) and view the table. Create a derived dataset from this table and publish.
Once you publish the dataset, the data source displays on the header of the dataset.
- From related actions off the data source, select Custom Report > Create
- The usual Custom Report form displays. Name your report, select Matrix for report type, and click OK (Workday fills the data source).
Note: The fields you select for the AC report should reflect Workday instances of worktags or orgs. Fields like Company or Ledger account are sound choices for reconciling to the journal but are only available if those fields are in the enrichment dataset. The use of instances will help connect the values to the GL values. You can use AC-only fields (attributes or input fields) for Drill fields. However, they won’t link to GL fields, so they shouldn't list as group by fields. - Complete the Matrix tab by adding the Row Grouping fields (see Note above). Also add the Fields to Summarize. Leaving the Count field might make sense. Adding a sum for the amount fields in the enrich data is what you will probably be comparing to the GL. It’s important to understand the accounting configuration on the accounting source to ensure you’re selecting the right fields to group and sum the report.
- For reports on Prism data sources, you must define Detail Data fields on the drill-down tab. They can simply match the fields you added to the Matrix tab.
- On Filter tab, add the fields that make sense for the report if any. Like any report, you can make prompts or hard code. Think about filters that will help limit the data from AC that you’re trying to compare to the GL. Tip: The Accounting Date uses the field from the dataset, which is a very useful filter.
- If you added prompts to the Filter tab, on the Prompts tab click the Populate Undefined Prompt defaults. Workday should add the prompts.
Note: Since we’re adding this report to a composite report, don’t populate default prompts here. Prompt mapping on the Composite report is faster if you suppress prompts you won’t use in the composite report (probably more applicable to the GL Journal report). - In the Share tab, share the report with all users.
- Optionally, add Save Parameters under Advanced tab.
- Click OK to save the report. Run the report to test.
GL Data
Workday usually creates the GL data from the Journal Lines for Financial Reporting report data source. The steps for creating the matrix report are very similar to the AC report steps.
Steps to create GL data matrix report:
- Create custom report.
- Name the report, select Matrix report type, and select Journal Lines for Financial Reporting as data source.
- Complete the Matrix tab. Row grouping fields should match the fields selected in the AC data report so that the composite report can display the data consistently. Fields to Summarize can be the Ledger Debits and Credits fields and perhaps the Debit minus Credit field. Adding these fields to the report makes them available but not necessary to use in the composite report.
- On drill-down, usually best to keep the relevant Drill fields for this analysis. The GL drill fields are vast and most don’t make sense for this exercise.
- Filter tab: Use similar fields as the AC. Also be sure to include a field that will filter the results to just those journal lines produced by the Accounting Center process. Journal source, for example, can be useful.
- Prompts: The journal lines have many prompts that you might not need. You can click off the Don’t Prompt at Runtime to minimize the list of prompts that you need to deal with in the composite report.
- Share: Make sure to share the report with all authorized users.
- Click OK to save.
Composite Report
Once you’ve created the subreports, you’re ready to assemble the composite report. The composite report allows you to pull in data from multiple data sources (AC Data and GL Data) to generate a variance.
Steps to Create Composite Report:
- Create custom report.
- Name the report and select Composite for report type.
- You can fill out Prompt set later.
- Fill in Business Object Enabled for Filtering and Grouping. Use the fields that you added to matrix reports in the row grouping. These fields need to be in both matrix reports (Company and Ledger account for example). If you use outlining, then you can add the hierarchy structure.
- Click OK.
- Once the report rows and columns display, define the columns and rows for the report.
Control Column
The 1st column (C1) will be a control column.
- Select the column and in the top right of the column header a button displays.
- Click to define the column, hover over Define, and select Control column.
- This column controls what displays in the rows unless the row definition overrides the column.
Data Columns
Create data columns that reference the matrix reports you have already created and add them to the composite report.
- Select the column and in the top right of the column header, a button will display.
- Click to define the column, hover over Define, and select Data column.
- Name the column and select the subreport created earlier and map any prompts as required.
Variance Column
Add the Variance column to include the calculation of the difference between the AC Data and the GL Data.
- Select the column and in the top right of the column header a button will display.
- Click to define the column, hover over Define, and select Calculation column.
- Configure the calculation keeping in mind the signs of the amounts from each subreport. For instance, an amount could represent a positive amount in the AC Data but is a credit balance (negative) in the GL Data.
Note: You can only analyze the data in the composite report for the fields that are common between the subreports. For example, if ledger account derives from an Account Posting rule, it won’t be available on the Enrichment dataset.
Create a Discovery Board that includes visualizations for each stage of the batch. Create derived datasets from each of the listed datasets and set them to publish with the completion of the summarization stage.
Ingestion Viz
Instead of using the true Ingestion DDS, use the mapped ingestion dataset (XX_SYS_MappedIngestionData). It’s the Input dataset for the 1st Enrichment stage as it contains the AC batch field. That way the user can track 1 batch all the way through the process.
1. Data Source panel: Select the mapped ingestion PDS and Next.
2. Builder panel:
- Update report type to Matrix > Pivot Table.
- Select the fields necessary to analyze the ingested data.
- Select the summary fields.
3. Filter panel: Select any fields to assist in filtering the data.
Enrichment Viz
The enrichment visualization uses the enriched data table (XX_ENR_#_TBL_EnrichedData) which is the Output dataset from the last enrichment stage. Build the viz using the same parameters as the Ingestion viz to compare counts of records and amounts.
Detailed Accounting Viz
The Detailed Accounting visualization makes use of the Summary and Detailed Accounting Reference dataset (XX_SummaryandDetailedAccountingReference) which is the Reporting dataset for the accounting source.
Build the viz using the same parameters as the Ingestion viz to compare counts of records and amounts. You can also include information specific to the journal (ledger account and debit/credit amounts) since these fields are available on the Reporting dataset.
GL Journals Viz
The GL Journals viz pulls the data from the Journals data source, which represents the posted journals from the batch. On the Data Source panel, select the data source prompts as if you were running a report.
In this case you can use:
- Data Source Filter (required)
- Company (required)
- Year (required)
In the Builder panel, select the fields necessary to review the data. This includes all journals until you configure the filter.
The Filter panel is important as well to narrow down the journals that Workday returns.
To isolate AC journals, you can use Accounting Journals = F and Operational Journals = F. What remains are AC journals:
An example of a complete Discovery Board:
[Click image to enlarge]

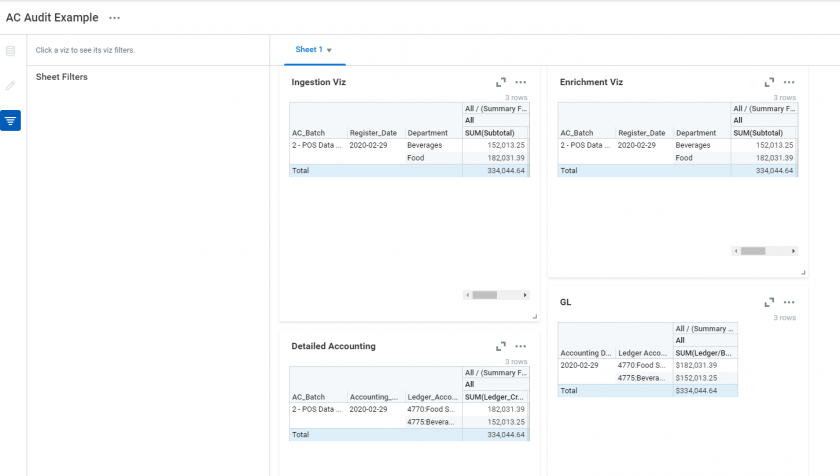
>Note: If your Accounting Source is creating intercompany journal lines, then your Detailed Accounting and GL Journals might not equal your data sources amounts.
The intercompany lines should eliminate so you could potentially use Journal Lines for Financial Reporting for the GL Journals viz. If you perform Intercompany Eliminations, it should suppress the IC lines and just display the natural lines to equal the data source lines.
Overview of Accounting Source Tables and Datasets
To view the datasets and tables associated with an Accounting Source, take a related action from the Accounting Source and select View Implementation. See Workday Administrator Guide here for more details on the purpose of each dataset and table within an Accounting Source.
Pre-Ingestion Transformations
Unpivot
When the source data has multiple columns of amounts that are required for journal line configuration, it can make the accounting configuration more efficient if the amount columns are converted to rows. Example:
- One row can have different accounting based on the amount used
- One row can have different worktag mapping based on the amount used
- One row can have different amounts populated
- Row 1 has amounts 1,2,3
- Row 2 has amounts 1,3
- Row 3 has amount 2 only
Assume in this source table that each amount field requires different ledger accounts and set of worktags for accounting:
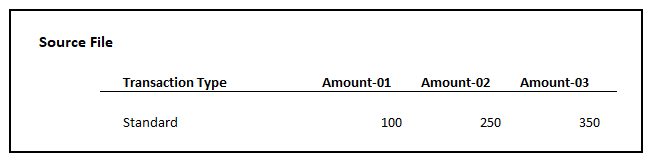
Since each amount shares the same attributes, it’s difficult to differentiate each amount to apply the correct combination of ledger accounts and worktags. This format could require hardcoding logic into datasets or accounting configuration to get the desired accounting.
Use unpivot to transform the columns into rows to map ledger accounts and worktags at the amount type level:
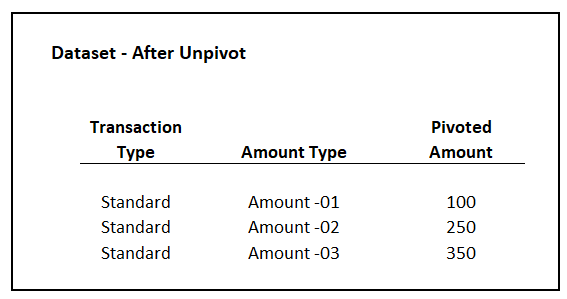
Configuring Unpivot
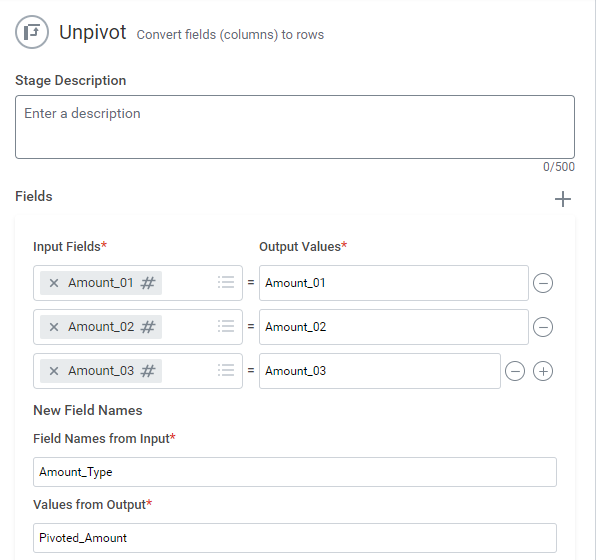
Review the Workday Administrator Guide for more detailed information on the unpivot stage.
Other Considerations
Since unpivot changes the number of records, it’s best to perform this transformation before ingestion. Otherwise, a transaction grouping ID must be applied.
Filtering can be done for any zero amount rows.
Ingestion
Net New Transactions in Accounting Source Ingestion Table with Data Change Task
There can be instances when the Data Change Task includes records from the Source table that have already been processed through Accounting Center. The accounting center process won’t recognize these as already ingested records since the WPA IDs on the Source table differ from the WPA IDs on the Ingestion table. This isn’t an issue if your DCT is an Update only or if your DCT appends only new records.
There are two ways to ensure that records are only processed once:
- When loading new data into the Source table, use the target operation Truncate and Insert. Understand with this option that you’ll lose previously ingested transactions within the Source table. (The transactions will be retained within the Ingestion Table.)
- Configure the DDS for the Data Change Task with logic that returns only transactions that haven’t been processed. This configuration will maintain the previously ingested transactions in the Accounting Source tables but only process the new transactions. Steps on how to configure this are below.
Transaction Flow
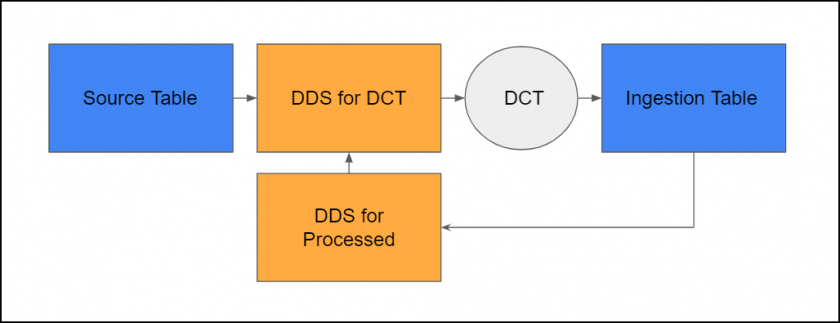
Steps
Add Source WPA Fields to Ingestion Table
Ensure that you’ve added the Source WPA fields to the Ingestion Table. These will be mapped to the WPA fields on the Source Table in the DCT.
Create DDS from Ingestion Table for Processed Transactions
The Accounting Source ingestion table contains all the records that have been ingested into Accounting Center.
Similar to the Reporting Tables section above, ensure that you add a filter to the DDS that excludes older transactions using the WPA_LoadTimeStamp. For example, if you process batches daily, you may only need to bring in the last 7 days of transactions to compare your source data against. This keeps the process more performant by reducing the volume of data that is joined together.
Add a Manage Fields stage to leave only the Source_WPA_LoadID and Source_WPA_RowID fields. These represent the WPA_LoadID and WPA_RowID from the Source Table.
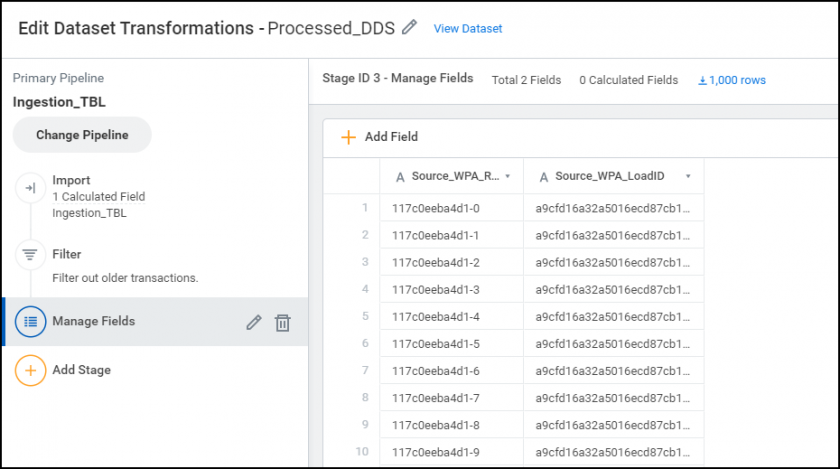
Create DDS from Source Table for Data Change Task
The DDS for the DCT will contain all the necessary prebatch processing and be joined with the DDS from the Ingestion Table to retain only records with no Source WPA IDs (they haven’t yet been ingested).
Add a filter to the DDS to exclude older transactions using the WPA_LoadTimeStamp. This again keeps the process more performant.
Join the DDS for processed transactions. Match the WPA_LoadID and the WPA_RowID from the primary pipeline to the Source_WPA_LoadID and the Source_WPA_RowID from the Processed DDS. Select Left Outer Join so that all primary pipeline rows are retained. Be sure to carry over all the fields from the primary pipeline and Source WPA fields from the Processed DDS.
Add a filter stage where Source_WPARowID is NULL.
Add manage field stage to hide the Source WPA fields.
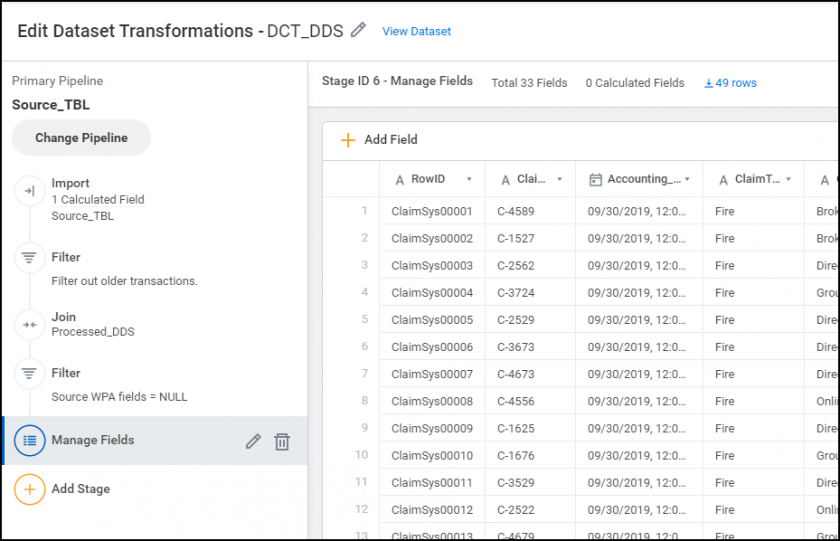
Create Data Change Task to Include in the Accounting Source
The source for the DCT is the DCT DDS that has been configured to only bring forward the transactions that haven’t already been ingested into the Accounting Source.
The target is the Ingestion Table and the target operation is Insert.
Ensure that the mapping is correct. Note that the Source WPA fields are populated on the Ingestion Table from the WPA fields on the Source Table.
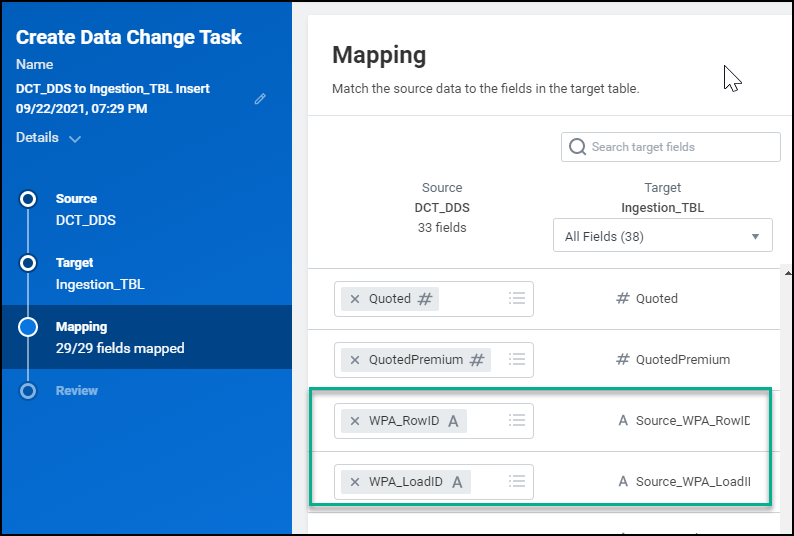
When added to the Accounting Source, this DCT runs each time a batch is initiated.
Using Transaction Grouping ID
When to Use
- Two or more records need to be kept together to create a single balanced transaction
- Example: balanced journals provided by legacy system for GL Conversion
- A single ingested transaction is expanded into multiple rows
- Example: spreading a record for an insurance policy lasting 1 year into 12 rows representing each month of the policy
When Not to Use
- One record will generate a balanced debit and credit
- Example: POS transaction that will hit revenue account and cash account
Recommendations When Using
- Use a calculated field for Txn Grouping ID so that the field can easily be updated or changed as needed. We recommend wrapping the calculated field with a TRIM(TO_UPPER([Field])) function so that extra spaces or different cases do not cause the same Txn Grouping ID value to be recognized as different values across rows.
- If the data contains transactions that will create multiple journals, configure a Txn Grouping ID that contains all journal header elements including:
- Header Company
- Book Code
- Currency
- Date (recommend including so that your Txn has a consistent date. If this is not included and your Txn contains multiple dates, Workday will select one for the journal header.)
- Reversal Option
- Individual transactions should ideally be kept to under 20,000 records for optimal performance, and can have a maximum of 300,000 records per transaction. Transactions above this 300K limit will hit a validation error in Detailed Accounting. See this Contributed Solution for configuration options if your records counts are above this limit.
Considerations
- Batch performance will be slower when using transaction grouping
- Txn Grouping ID keeps data together in two main places:
- First is in validations so that if one record has an error they are all kept together
- Second is in Detailed Accounting so it can confirm data balances at that level and keep data together for error handling
- Txn Grouping IDs cannot be removed from an Accounting Source, however they can be added after it is configured. If you are unsure whether one is needed, configure the AS without one at first and then add it if needed.
- Txn Grouping ID must be part of the Ingestion_TBL to be selected
- Txn Grouping ID must be alphanumeric
- Txn Grouping ID becomes part of the AC_Transaction_ID
- <Batch#>.<TxnGroupingID>
Enrichment
How to Map Companies into Data
While Company isn’t an available business object for the mapping table definition, Intercompany Affiliate is. This field is interchangeable with Company for the purposes of configuring the accounting. Map the company from the ingested data to the Intercompany Affiliate worktag type. Then select the Intercompany Affiliate as the company in the header and lines of the journal configuration.
Using a Join for Instantiation
Use Joins to instantiate fields from the raw ingestion data to a Workday instance, which you can then use in the accounting configuration. Joins require a common field by which to join and the field type must be the same. Detailed information about creating Joins can be found in the Workday Administrator Guide here.
We recommend that you use Tables in your Joins, and Tables can be populated from custom reports by using a Data Change Task as shown below:
Steps
- Create a custom report with the appropriate fields and settings as documented in Step 1 here.
- Create a Table using a Workday Report as your schema source and then select your custom report.
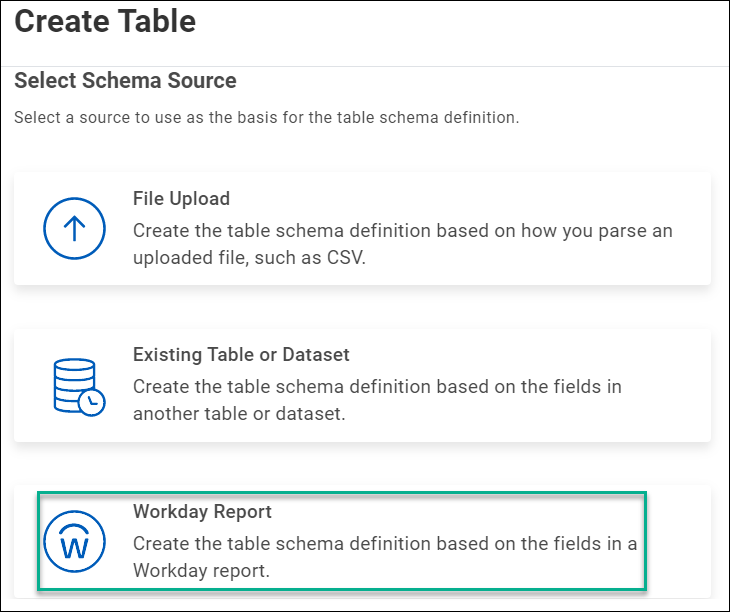
- Save your Table and create a Data Change Task (DCT) to populate the newly created Table. The DCT configuration should be:
- Source: select "change connection" button, Workday Report, and then the name of your custom report
- Target: select your Table from above and the appropriate operation (typically Insert for 1st load)
- Mapping: field mapping should automatically populate but ensure this is correct
- Select Save and Run Now on Finish button to populate table
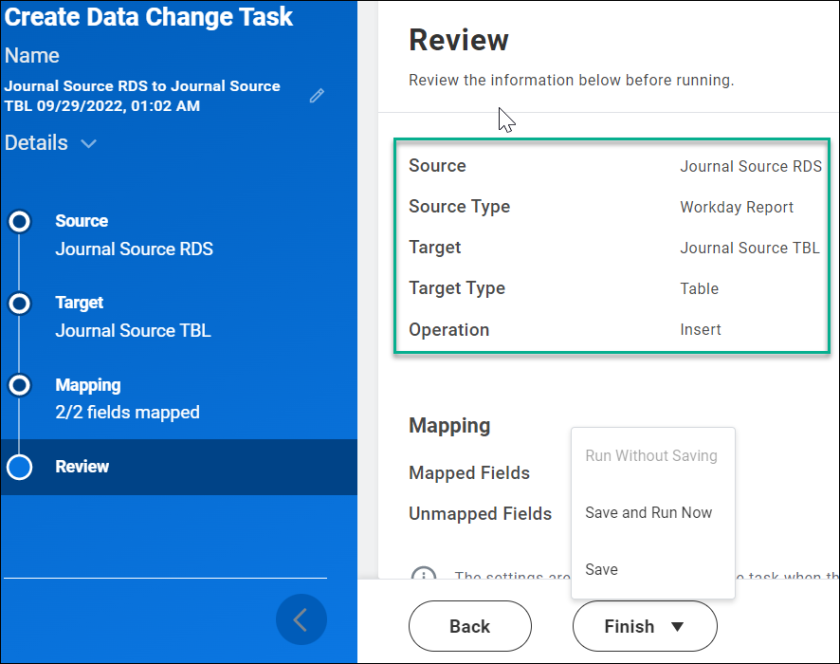
- Confirm that DCT has run successfully and that the Table is now populated
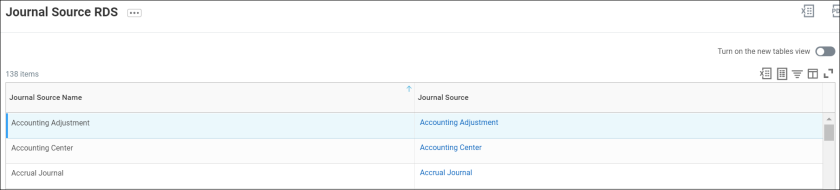
Instantiating Journal Source
There’s a new 'Journal Source' data source (non-indexed) that can be used to instantiate Journal Source in Enrichment. Below is an example of the custom report and this can be brought into a Table using the steps above.
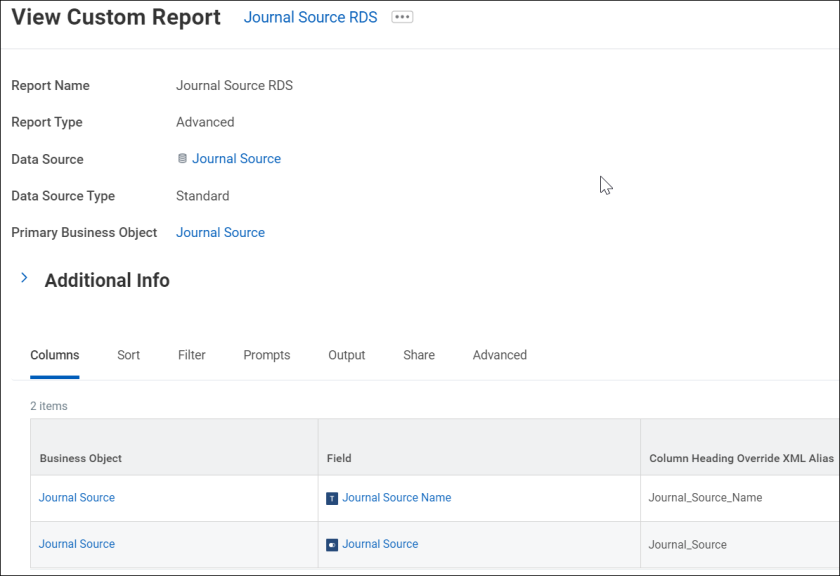
Instantiating Book Code
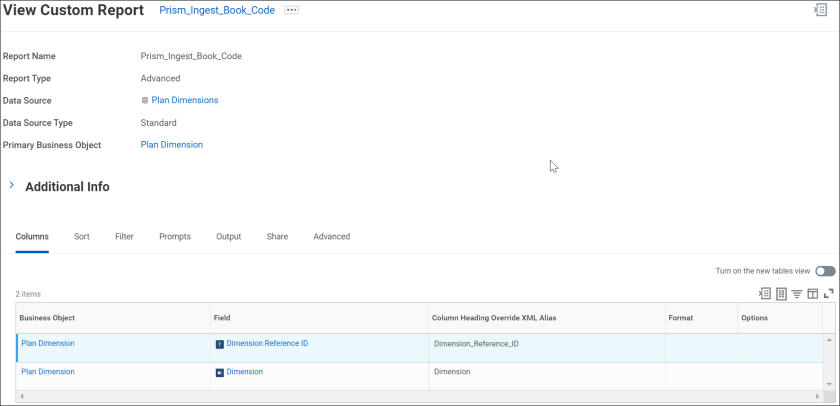
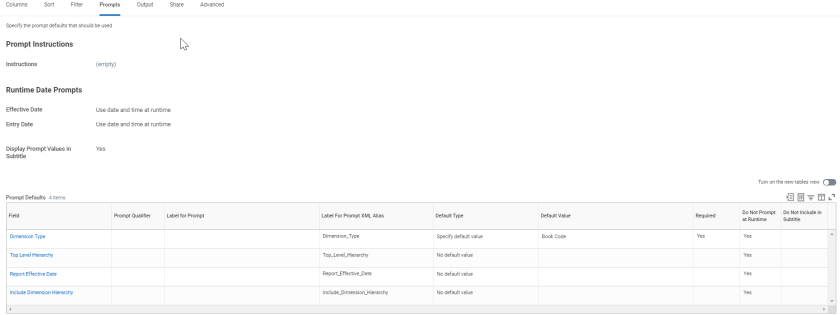
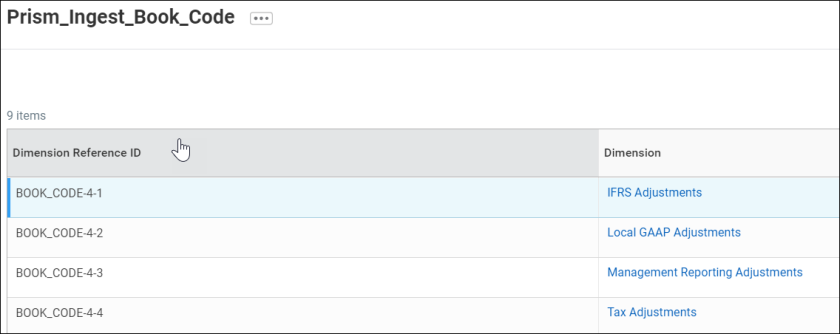
To instantiate book code, you can create a report that uses the Plan Dimensions data source, and create a Prompt on Dimension Type and select Book Code. Below is an example of the custom report and this can be brought into a Table using the steps above.
Instantiating Custom Organizations and Custom Worktags
To instantiate Custom Orgs and Custom Worktags:
- Create 1 report that contains all Custom Orgs and 1 report that contains all Custom Worktags
- Create Tables from custom reports and create DCT to load Tables
- Create DDS off of the Tables for each Custom Org/Worktag type that you need. Add a filter stage to DDS to keep only that specific Custom Org/Worktag type and filter out the other values.
- Add Managed Fields stage to update field name and update Business Object to the correct value
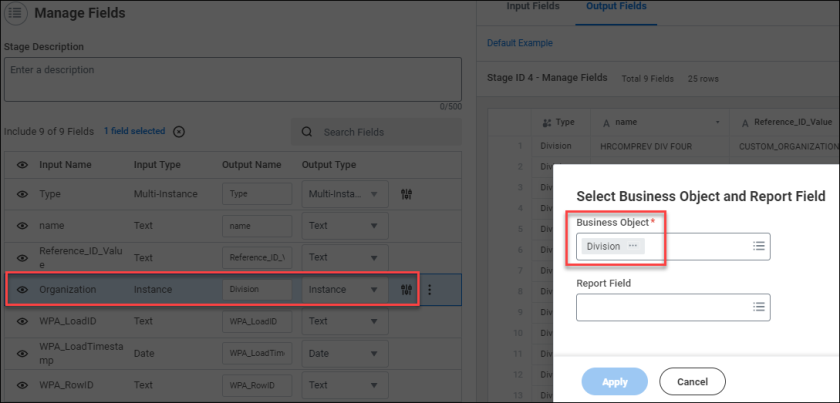
This will ensure that the Custom Org/Worktag is available for selection in your journal line rules and that it is populated on the resulting AC Detailed and Summary journals.
Accounting
One Sided Intercompany
With 2023R1, Workday enables you to enter one sided I/C transactions in Accounting Center where you define the intercompany ledger account and intercompany affiliate worktag on detailed journal line.
Accounting Center Migration Tasks
- Filename
- Accounting Center Migration Tasks - 2023R2_0.xlsx
- Size
- 115 KB
- Format
- application/vnd.openxmlformats-officedocument.spreadsheetml.sheet