Document Printing for Spend Management
With Workday, you can produce PDF documents for printing with the use of integrations to pass the data to a third-party system. We’ve outlined the steps needed to set up document printing with Workday Inventory and Procurement.
Note that steps outlined below have WDSetup assumed as your starting point. Most of the configuration can now be used from WDSetup with some simple changes to meet your needs. It’s recommended to use this as the starting point for any document printing setup.
This tool should be used if you need to produce a document for any of these processes:
- Goods Delivery
- Pick Inventory
- Inventory Shipment
- Purchase Order
- Par Count
- Inventory Count
See the Steps section for pictures of documents.
Before you begin configuring the spend documents for viewing and printing, you need to import the BIRT USA Inventory and/or BIRT USA Procurement configuration package from Customer Central. Review BIRT Layouts for further details about migrating the packages from the Configuration Catalog.
Note that steps outlined below have WDSetup assumed as your starting point. Most of the configuration can now be used from WDSetup with some simple changes to meet your needs. It’s recommended to use this as the starting point for any document printing setup.
- If you need the generated PDF to print automatically, then a third-party file transfer service is been needed to transfer the produced PDF file from an Email or SFTP server to the print spooler.
- If auto printing isn’t required, then Workday natively provides you with the ability to open, save, and print PDF documents manually.
- When configuring each document, the referenced Business Form Layout is delivered from WDSetup. It’s common to need your own custom layout, and you might need to configure a new Business Form Layout.
The setup steps defined below help with configuring Workday to produce documents similar to the examples in each document section.
Goods Delivery Document
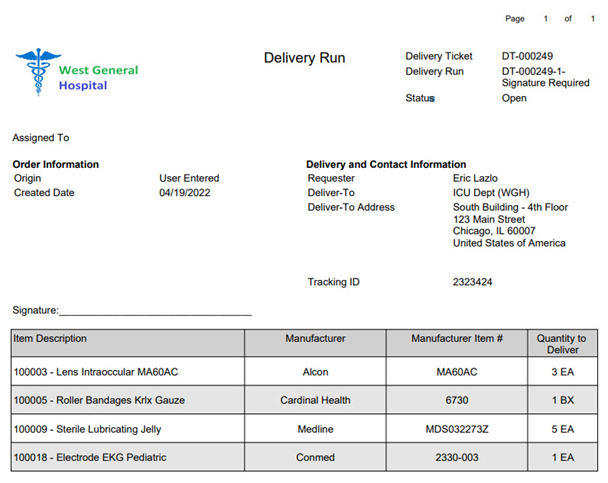
- Create Goods Delivery Run Print Layout
- When selecting the company for the layout, consider whether the layout is universal for all companies or not. If not, create a separate layout for each company that has a unique layout.
- Select the FIN USA Goods Delivery business form layout.
- If you select Include Company Logo, then you must add the logo as a Token by performing the Configure task from the Related Actions of the Business Form Layout
- If barcodes are wanted for the Delivery Ticket and Purchase Item field, select Include Barcodes.
- To help identify any changes needed to the print layout, Create a Goods Delivery Run with test data.
- Print Goods Deliveries to generate a PDF of the test Goods Delivery Run created in the previous step.
- (Optional) Modify Report Design to align with any specific changes you require. Changes need to be made using Workday Studio.
- Configure Goods Delivery Run Business Process to generate the PDF document.
- For Workday to generate the PDF document automatically, a Report step is needed on the Goods Delivery Run Business Process. WDSetup delivers this step preconfigured to create the PDF and send it to the Inventory Specialist security group.
- If you don’t intend to use the generated document from the inbox of the Inventory Specialist, then it’s leading practice to assign an Integration System User (ISU) as the security group for the report step on the business process. By doing so, the report is generated one-time rather than the number of users assigned to the Inventory Specialist group.
- If you expect the goods delivery document to print automatically near real time, then assigning an ISU to the report step provides the best experience as it minimizes the runtime for the report generation. Also, a Document Delivery business process step needs to be added to the Goods Delivery Run Business Process to accommodate delivering the generated PDF to the SFTP or Email Server.
Inventory Pick List Document
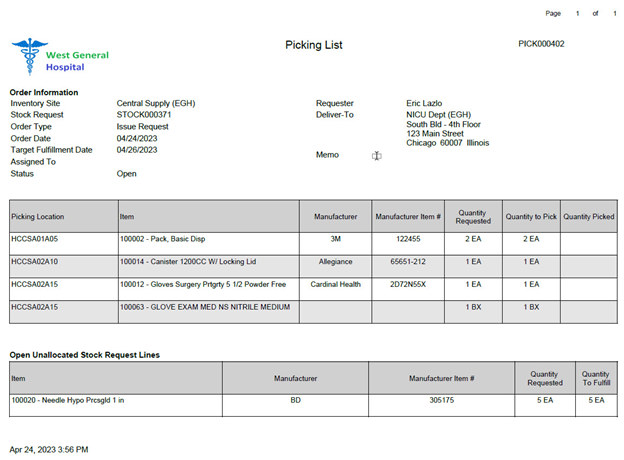
- Create Picking List Print Layout
- When selecting the company for the layout, consider whether the layout is universal for all companies or not. If not, create a separate layout for each company that has a unique layout.
- Select the FIN USA Picking List business form layout.
- If you select Include Company Logo, then you must add the logo as a Token by performing the Configure task from the Related Actions of the Business Form Layout
- If barcodes are wanted for the Pick List field and Purchase Item field, select Include Barcodes.
- Select Include Killed Stock Request Lines and/or Include Open Unallocated Stock Request Lines to display this information on the pick list document. Note: If you aren't using directed picking, but still want to have a pick list document then you must check that Include Open Unallocated Stock Request Lines as all nondirected picking is unallocated.
- To help identify any changes needed to the print layout, Create an Inventory Pick List with test data.
- Print Picking List to generate a PDF of the test Pick List created in the previous step.
- (Optional) Modify Report Design to align with any specific changes you require. Changes need to be made using Workday Studio.
- Configure Inventory Pick List Event Business Process to generate the PDF document.
- For Workday to generate the PDF document automatically, a Report step is needed on the Inventory Pick List Event Business Process. WDSetup delivers 2 steps preconfigured to create the PDF and send it to the Inventory Specialist security group. The 2 steps are configured to handle generating Directed Picking List and Picking List (unallocated picking) depending on the inventory site configuration.
- If you don't intend to use the generated document from the inbox of the Inventory Specialist, then it’s leading practice to assign an Integration System User (ISU) as the security group for the report step on the business process. By doing so, the report is generated one-time rather than the number of users assigned to the Inventory Specialist group.
- If you expect the Inventory Pick List document to print automatically near real time, then assigning an ISU to the report step provides the best experience as it minimizes the runtime for the report generation. Also, a Document Delivery business process step needs to be added to the Inventory Pick List Event Business Process to accommodate delivering the generated PDF to the SFTP or Email Server.
Inventory Packing Slip Document
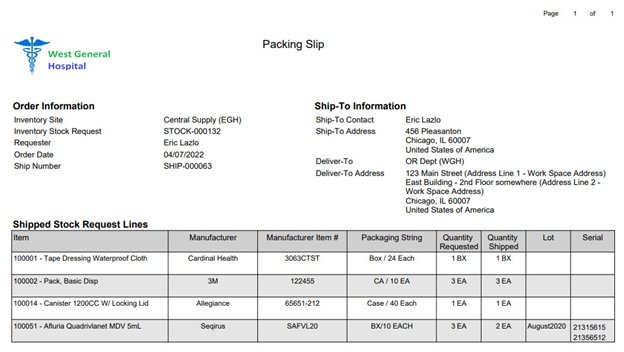
- Create Packing Slip Print Layout
- When selecting the company for the layout, consider whether the layout is universal for all companies or not. If not, create a separate layout for each company that has a unique layout.
- Select the FIN USA Packing Slip business form layout.
- If you select Include Company Logo, then you must add the logo as a Token by performing the Configure task from the Related Actions of the Business Form Layout
- If barcodes are wanted for the Shipment Number field and Purchase Item field select Include Barcodes.
- Select Include Killed Stock Request Lines and/or Include Open Unallocated Stock Request Lines to display this information on the pick list document.
- To help identify any changes needed to the print layout, Create Inventory Shipment with test data.
- Print Packing Slip to generate a PDF of the test Packing Slip for the shipment created in the previous step.
- (Optional) Modify Report Design to align with any specific changes you require. Changes need to be made using Workday Studio.
- Configure Inventory Shipment Event Business Process to generate the PDF document.
- For Workday to generate the PDF document automatically, a Report step is needed on the Inventory Shipment Event Business Process. WDSetup delivers this report step preconfigured to create the PDF and send it to the Inventory Specialist security group.
- If you don't intend to use the generated document from the inbox of the Inventory Specialist, then it’s leading practice to assign an Integration System User (ISU) as the security group for the report step on the business process. By doing so, the report is generated one-time rather than the number of users assigned to the Inventory Specialist group.
- If you expect the Inventory Packing List document to print automatically near real time, then assigning an ISU to the report step provides the best experience as it minimizes the runtime for the report generation. Also, a Document Delivery business process step needs to be added to the Inventory Shipment Event Business Process to accommodate delivering the generated PDF to the SFTP or Email Server.
Inventory Par Count Document
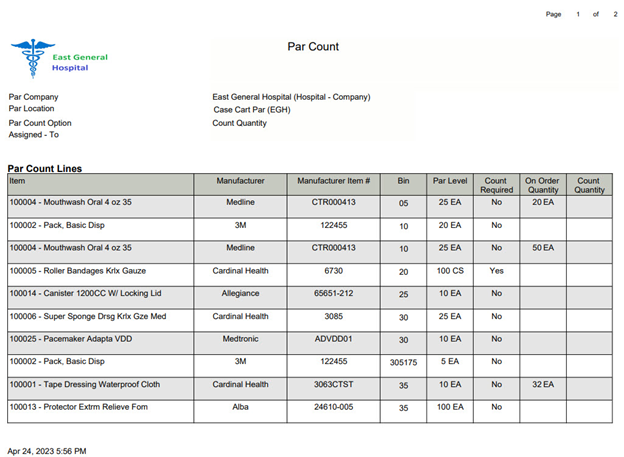
- Create Par Count Sheet Print Layout
- When selecting the company for the layout, consider whether the layout is universal for all companies or not. If not, create a separate layout for each company that has a unique layout.
- Select the FIN USA Par Count business form layout.
- If you select Include Company Logo, then you must add the logo as a Token by performing the Configure task from the Related Actions of the Business Form Layout
- If barcodes are wanted for the Par Location and Purchase Item field, select Include Barcodes.
- If no Par locations are built, create one with test data to help with identifying any needed changes to the print layout.
- Print Par Count Sheet to generate a PDF of the test Par Count Sheet for the Par location created in the previous step.
- (Optional) Modify Report Design to align with any specific changes you require. Changes need to be made using Workday Studio.
- Note that Par Count Sheets aren’t preconfigured in WDSetup to be automatically created as part of a business process. To generate the PDF, the Print Par Count Sheet task must be run
Inventory Count Sheet Document
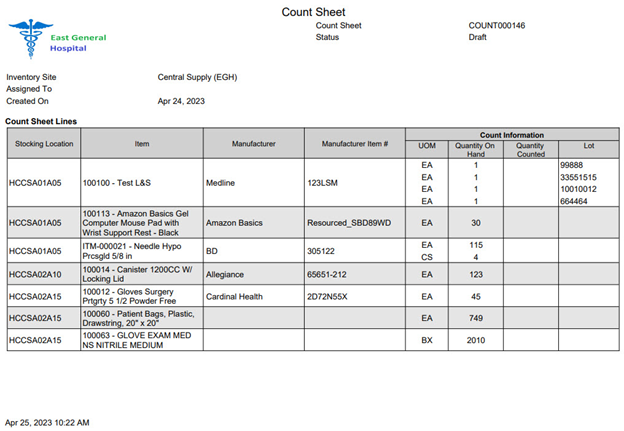
- Create Count Sheet Print Layout
- When selecting the company for the layout, consider whether the layout is universal for all companies or not. If not, create a separate layout for each company that has a unique layout.
- Select the FIN USA Inventory Count Sheet business form layout.
- If you select Include Company Logo, then you must add the logo as a Token by performing the Configure task from the Related Actions of the Business Form Layout
- If barcodes are wanted for the Count Sheet field and Purchase Item field, select Include Barcodes.
- To help identify any changes needed to the print layout, Create Inventory Count Sheets with test data.
- Print Inventory Count Sheet to generate a PDF of the test Inventory Count Sheet created in the previous step.
- (Optional) Modify Report Design to align with any specific changes you require. Changes need to be made using Workday Studio.
- Note that Inventory Count Sheets aren’t preconfigured in WDSetup to be automatically created as part of a business process. To generate the PDF, the Print Inventory Count Sheet task must be run.
Purchase Order Document
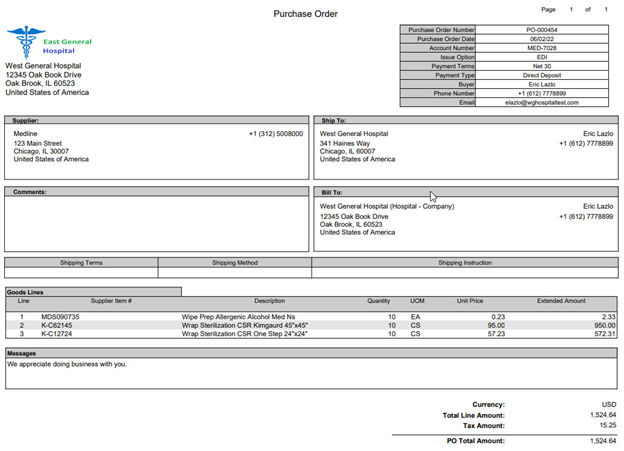
- Create Purchase Order Print Layout
- When selecting the company for the layout, consider whether the layout is universal for all companies or not. If not, create a separate layout for each company that has a unique layout.
- Select the FIN USA Purchase Order business form layout.
- If you select Include Company Logo, then you must add the logo as a Token by performing the Configure task from the Related Actions of the Business Form Layout
- If you select Include Signature, then you must add the signature as a Token by performing the Configure task from the Related Actions of the Business Form Layout
- If financial messages need be printed on each purchase order, create and add the financial messages in the order that they should be displayed on the document.
- To help identify any changes needed to the print layout, Create Purchase Order with test data.
- Navigate to the purchase order created in the previous step. From the Related Actions, select Printable Version to generate the document.
- (Optional) Modify Report Design to align with any specific changes you require. Changes need to be made using Workday Studio.
- Note that Workday automatically generates the PDF document when issuing the purchase order. To email the PDF to the supplier when issuing, some additional configuration is needed. To complete the configuration required, see Steps: Configure Email Notifications for Purchase Order Issue.